After doing this tutorial, you will learn how to create a 3D wine bottle in Illustrator, artwork in Flash, and a label in Photoshop. To do this tutorial you will need some knowledge of how to use the pen tool. If you do not know how to use the pen tool, watch this
VIDEO.
First, lets create our wine bottle in Adobe Illustrator CS5.
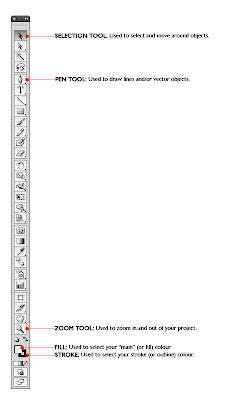
[IMAGE LEFT] Here are the tools you will be using for this tutorial. If you open up Illustrator and you do not see this tool bar, go to "WINDOWS" and select "TOOLS".
LETS START!
1. After you've started up Illustrator, at the top of the menu bar select: "FILE" >"NEW". Use the default settings and leave it as size "LETTER". Click OK.
2.We can either free hand draw or use an actual image of a bottle as reference. Bur to create 3D objects in Illustrator, you only draw HALF of the object. This is optional: I'm going to save this image (
WINE BOTTLE) onto my computer and bring it into Illustrator. "FILE" > "PLACE" > select the wine image you just saved > "OK". The wine bottle image might be small so to enlarge it, click on the image, hold "SHIFT" and drag out the image by clicking on the corner of the image.
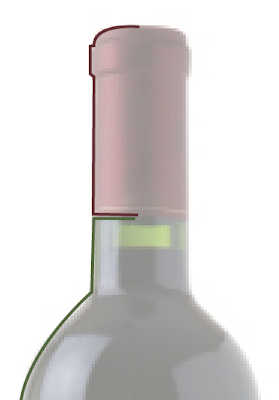
3.We are now going to create the 3d component. To do this we need to start by drawing an outline of only HALF of the wine bottle. First, choose the colour of the wine bottle by double clicking "STROKE" on the toolbar. (I used #353F2C). Now outline only one half of the wine bottle (stopping at the red top of the bottle out) like in the [IMAGE BELOW].

After drawing the bottle, select another colour for the top of the bottle (i used #633034) and continue tracing half of the top of the bottle. Use the "ZOOM" in if necessary.


4. Now that we have our lines drawn, lets make it 3D. Delete the wine bottle image, there will be no more need for it. Now click on the "SELECT" tool on the toolbar and Hold "SHIFT" on the keyboard and select both the lines. Go to the top of the menu select "EFFECT" > "3D" > "REVOLVE".
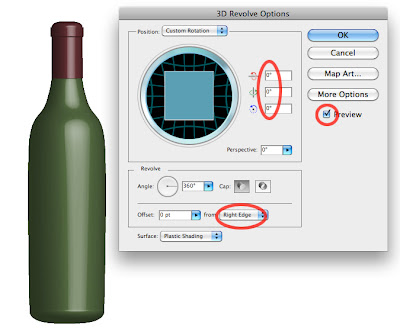
5. Click the "PREVIEW" box so you can see how this 3D effect will be applied to your lines. It looks like an odd shape at first but thats because you need to change some of the settings. Under the "REVOLVE" options, change the "OFFSET" to "Right Edge". You can play around with the angles, but for this example the angles are set to 0 degreees. Follow the example shown in [IMAGE BELOW] to have the same result.

To learn how to create the artwork in flash, visit my group member
Wade's Blog [PT.1]. And then come back to learn how to complete this tutorial on how to put the label onto the 3D wine bottle.
This is the the result of the flash artwork that my group members have created [
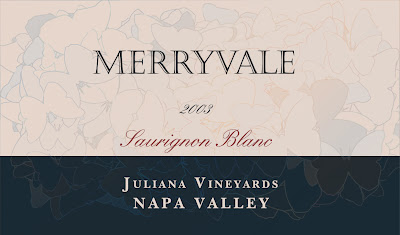
BUTTERFLY IMAGE]. You can edit the colours in flash within the code OR save this as a PDF file and open it in illustrator OR save it as a JPEG and play around with it in photoshop. For this example, I've already saved it as a JPEG and will now create the label in Photoshop.
1. Open up the artwork in Photoshop. IF you are unhappy with the colours, you can adjust them under "IMAGE" > ADJUSTMENTS > and play with the "HUE SATURATION, COLOR BALANCE, etc... I used "HUE & SATURATION".
2. Now that you have the label background, you can now add text. Use the "T" (type tool) to add type. You can change font, size and colour and other settings as soon as you click on where you want your type. The options will be at the top OR you can go to "WINDOW" > "CHARACTER".

3. Visit
Celia's Blog [PT.3] to learn how to place the label onto the wine bottle.


 After drawing the bottle, select another colour for the top of the bottle (i used #633034) and continue tracing half of the top of the bottle. Use the "ZOOM" in if necessary.
